
Opening the network menu and finding no Wi-Fi at all is unsettling, especially when you need to get online. The problem can be on the PC itself or in how it sees nearby networks, and the two look similar at first. You will find 8 fixes for Windows 11 Wi-Fi not showing up, ordered from the simplest checks to the bigger resets.
Table of Contents
Windows 11 Wi-Fi Not Showing Up: Missing Option or Missing Network?
Which one you have decides where to start.
- No Wi-Fi tile or no Wi-Fi page in Settings: the adapter is off, disabled or not loaded. Work through fixes 1 to 6 and 8.
- Wi-Fi works, other networks appear, yours doesn’t: jump to fix 7.
Before anything else, restart the PC and unplug the router for 30 seconds. That clears a surprising number of cases.
1. Turn Off Airplane Mode
Airplane mode switches every radio off, and its tile sits right beside the Wi-Fi one, so it’s easy to hit by accident.
- Press
Windows + Ato open Quick Settings.
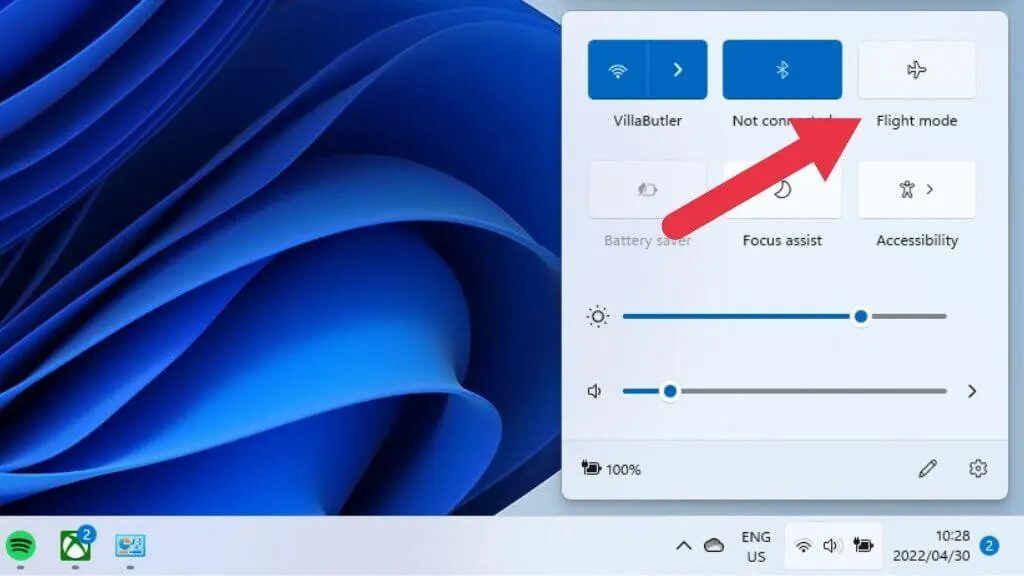
- Turn the Airplane mode tile off if it’s lit. Some laptops also have an Fn wireless key or a physical switch, so check those as well.
- Make sure the Wi-Fi tile is on.
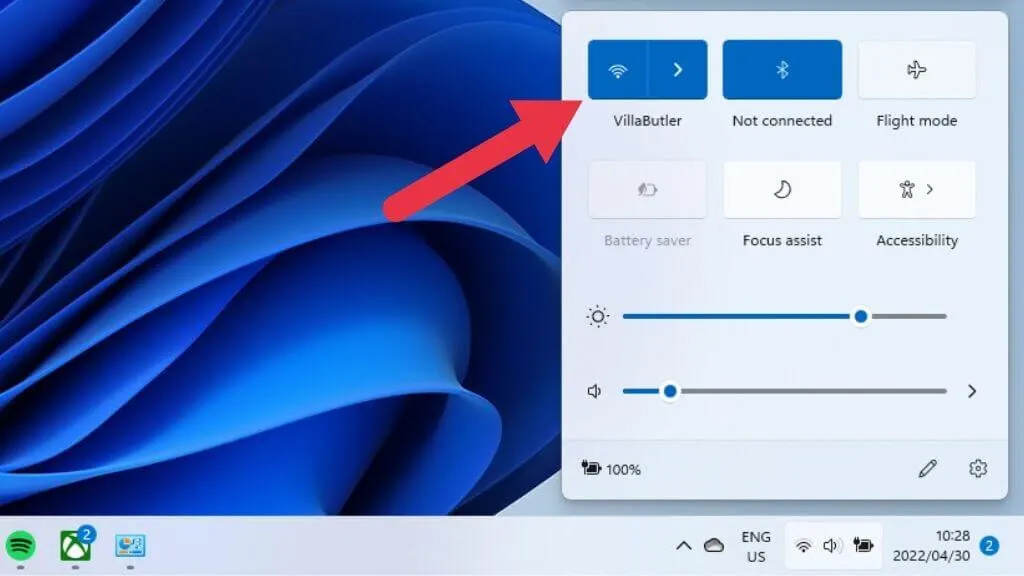
2. Run the Network Troubleshooter
The built-in troubleshooter checks for the common faults on its own.
- Click Start, then Settings.
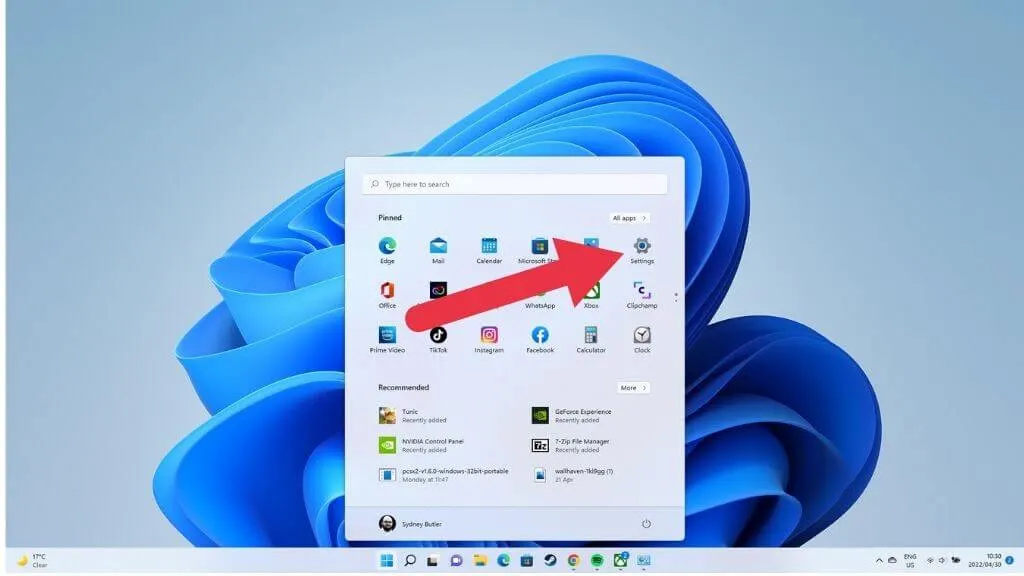
- Choose System > Troubleshoot.
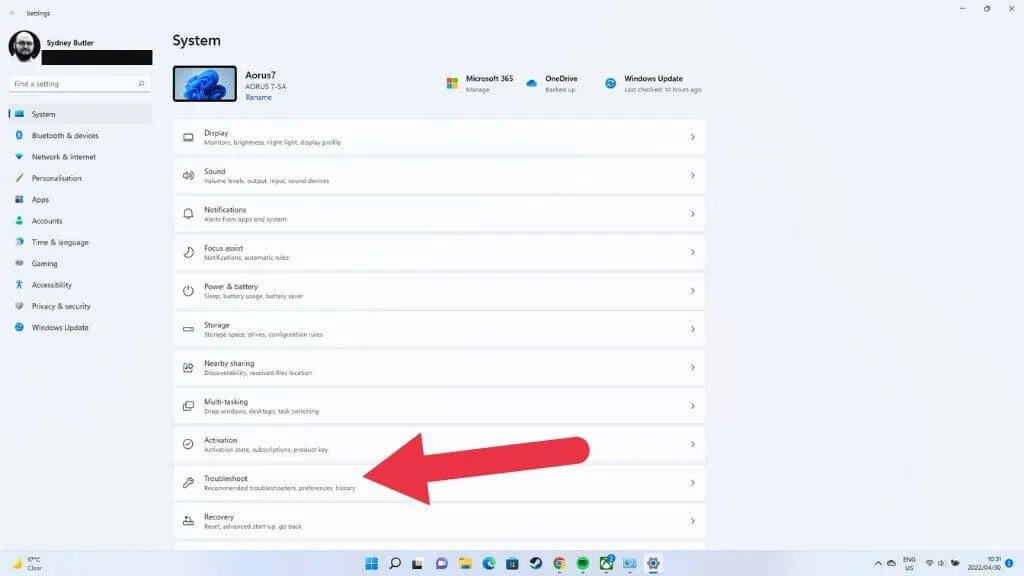
- Click Other troubleshooters, find Network and Internet and click Run. On newer builds of Windows 11 this opens in Get Help.
Another route is Network & internet > Status > Network troubleshooter.
3. Enable a Disabled Wi-Fi Adapter
A disabled adapter makes Windows act as if the PC has no Wi-Fi at all, and the Control Panel is where you turn it back on.
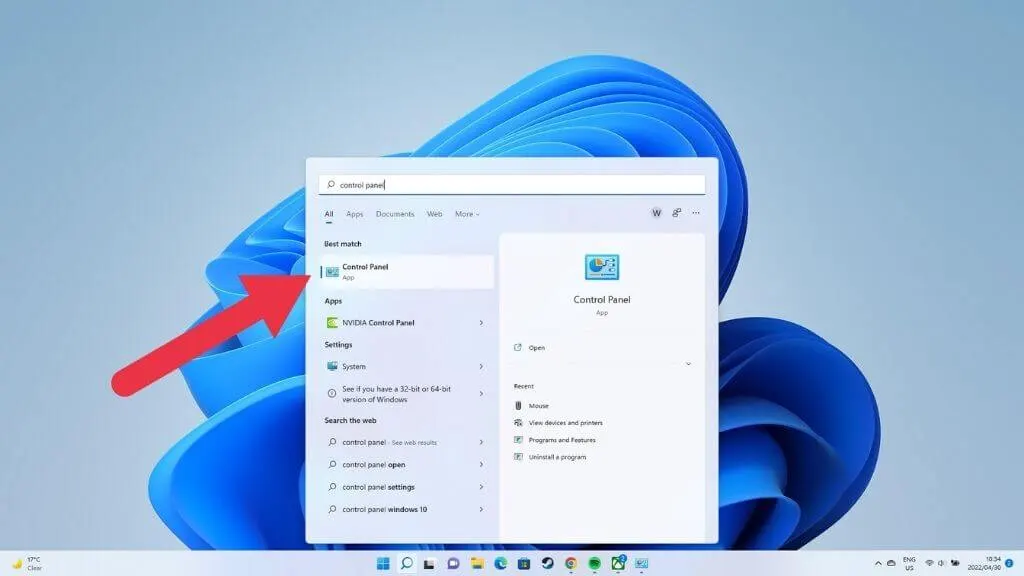
- Click Start, type
control paneland open it.
- Go to Network and Internet > Network and Sharing Center.
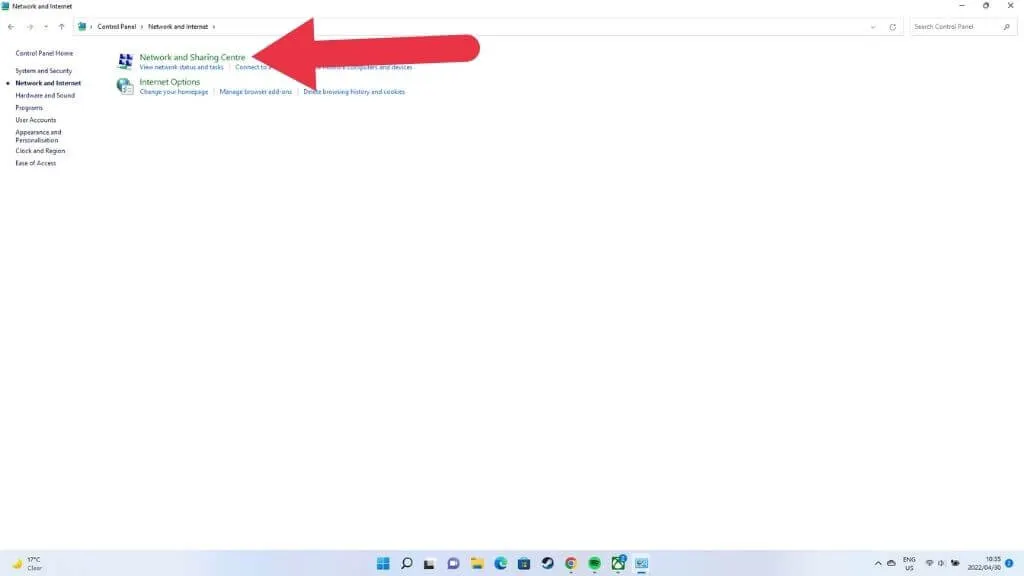
- Click Change adapter settings. The shortcut is
Windows + R, thenncpa.cpland Enter. - Right-click the Wi-Fi adapter and choose Enable. If it’s already enabled, Diagnose from the same menu runs a scan for that adapter.
An adapter marked with a red X can be disabled and enabled again to nudge it back.
4. Fix the Wireless Driver
Device Manager shows what state the driver is in, and that tells you what to do.
- Right-click Start and choose Device Manager.
- Expand Network adapters, right-click your wireless adapter and pick Update driver.
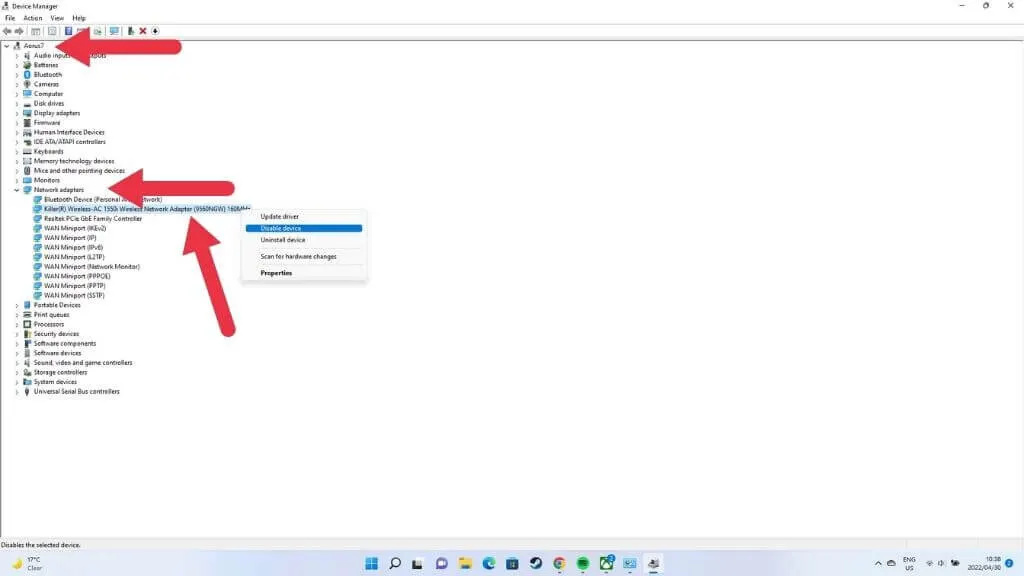
- If that doesn’t help, choose Uninstall device and restart so Windows reinstalls the adapter.
- Yellow exclamation mark: update the driver.
- Grayed out: right-click and choose Enable device.
- Adapter missing: click View > Show hidden devices, then Action > Scan for hardware changes.
- Problem began after an update: open the adapter’s Properties > Driver tab and use Roll Back Driver if it’s available.
When you uninstall, tick Attempt to remove the driver for this device if it appears. Without a connection you can’t download a fresh driver, so on another PC save the latest Wi-Fi driver from the maker’s website to a USB drive first, as a backup. Also open the adapter’s Power Management tab and clear Allow the computer to turn off this device to save power, which stops Wi-Fi vanishing after sleep.
5. Restart the WLAN AutoConfig Service
This service manages Wi-Fi connections, and it sometimes fails to resume after an update or sleep.
- Press
Windows + R, typeservices.mscand press Enter. - Double-click WLAN AutoConfig.
- Set Startup type to Automatic and click Start.
Give WWAN AutoConfig the same treatment if it’s disabled. Once the service shows Running, the Wi-Fi tile should return in Quick Settings.
6. Reset the Network Stack
A network reset reinstalls the adapters and returns networking to defaults, which is why it comes after the gentler fixes. If you’d rather try something gentler first, open Command Prompt as administrator and run these in order: netsh winsock reset, netsh int ip reset, ipconfig /release, ipconfig /renew, ipconfig /flushdns.
- Open Settings > Network & internet > Advanced network settings.
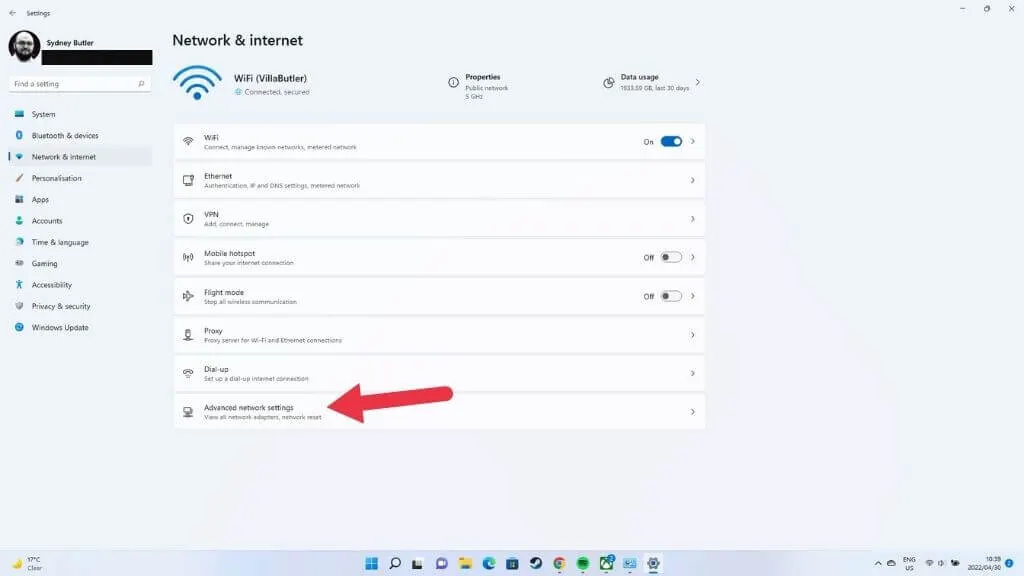
- Click Network reset.
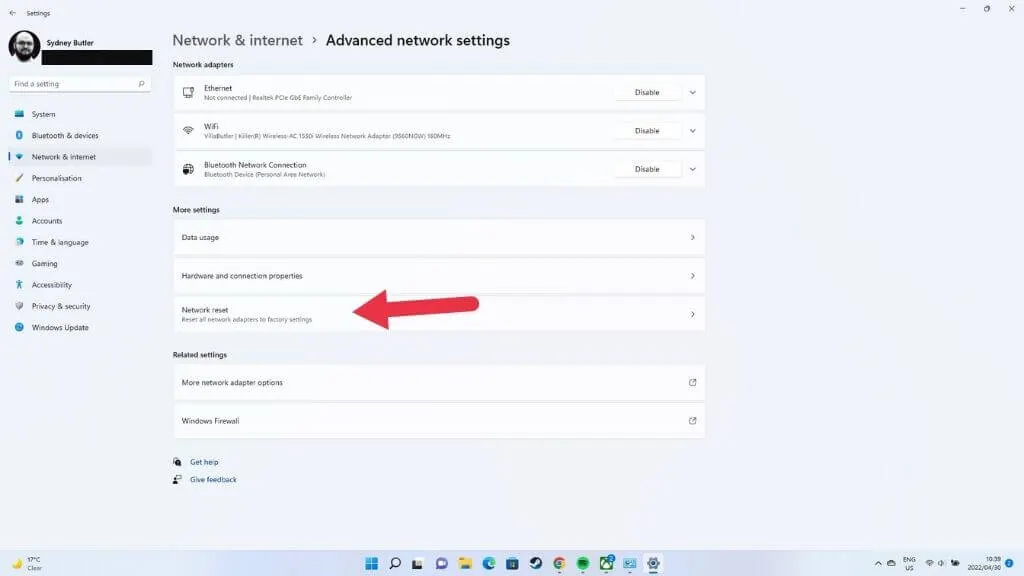
- Click Reset now. The PC restarts, and you’ll have to re-enter Wi-Fi passwords and reinstall any VPN software.
7. Only Your Network Is Missing From the List
If neighbors’ networks appear but yours doesn’t, the cause is the router or its settings.
- See whether other devices can find the network. If none can, the router is the problem.
- Move closer and refresh the list.
- For a hidden network name (SSID), go to Settings > Network & internet > Wi-Fi > Manage known networks > Add network and enter the name, security type and password.
- If the network is 5 GHz only and the adapter handles just 2.4 GHz, turn on the 2.4 GHz band on the router.
To check the link to the router itself, run ipconfig in Command Prompt, note the Default gateway address, then ping that address. Replies mean the PC reaches the router, and the fault is further along with the modem or your ISP.
8. Rule Out Failed Hardware
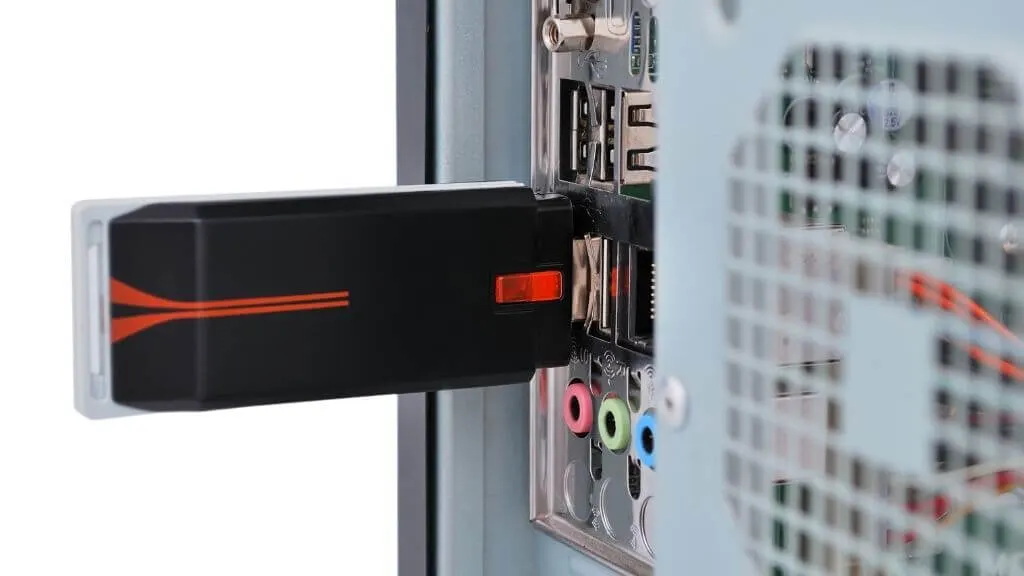
Shut the PC down fully, unplug the charger (and remove the battery if you can), then hold the power button for 30 to 60 seconds to drain leftover charge before starting again. If Wi-Fi is still gone, plug a USB Wi-Fi adapter into a free port, as shown below. If networks appear through it, the internal card is likely faulty.
Losing Wi-Fi is almost always fixable without special tools, and it helps to go in order rather than guess. If nothing works, the maker’s support or a repair shop can look at the hardware. Keep a note of what you change so you can undo it if needed. If pages still load slowly once you are back online, our guide to changing DNS on Windows 11 may help.


