
Some programs vanish with one click, while others hang around no matter what you try. Where to remove an app depends on how it was installed, and a few built-in ones are not meant to be removed at all. The four ways to uninstall apps on Windows 11 below start simple and cover what to do when an app refuses to go.
Table of Contents
1. Uninstall Apps on Windows 11 in Settings
The Installed apps list is the best first stop for most apps. If you’re clearing out space, sorting by size shows the worst offenders, and the guide to freeing up disk space on Windows 11 covers what else to clean.
- Open Start and select Settings.
- Select Apps, then Installed apps.
- Find the app with the search box, or open Sort by and choose Size.
- Select the three dots (More) next to the app, then Uninstall.
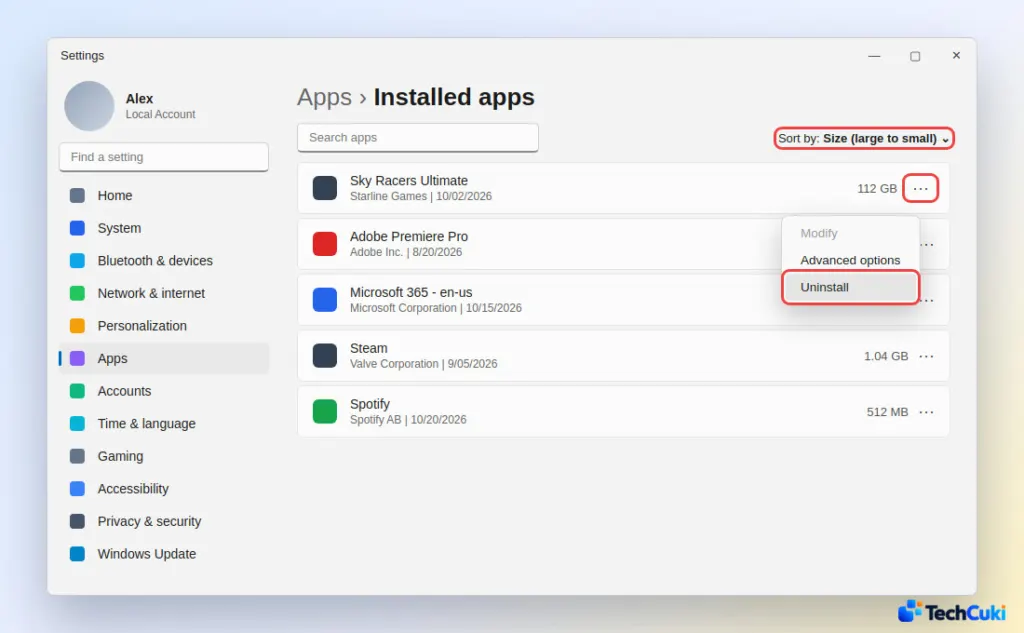
- Select Uninstall again to confirm.
If the app has no Uninstall option here, use Control Panel (method 3).
2. Remove an App From the Start Menu
This is the shortest route when you already know the app’s name, since it skips Settings entirely.
- Select Start, then All apps.
- Right-click the app, or press and hold on a touchscreen.
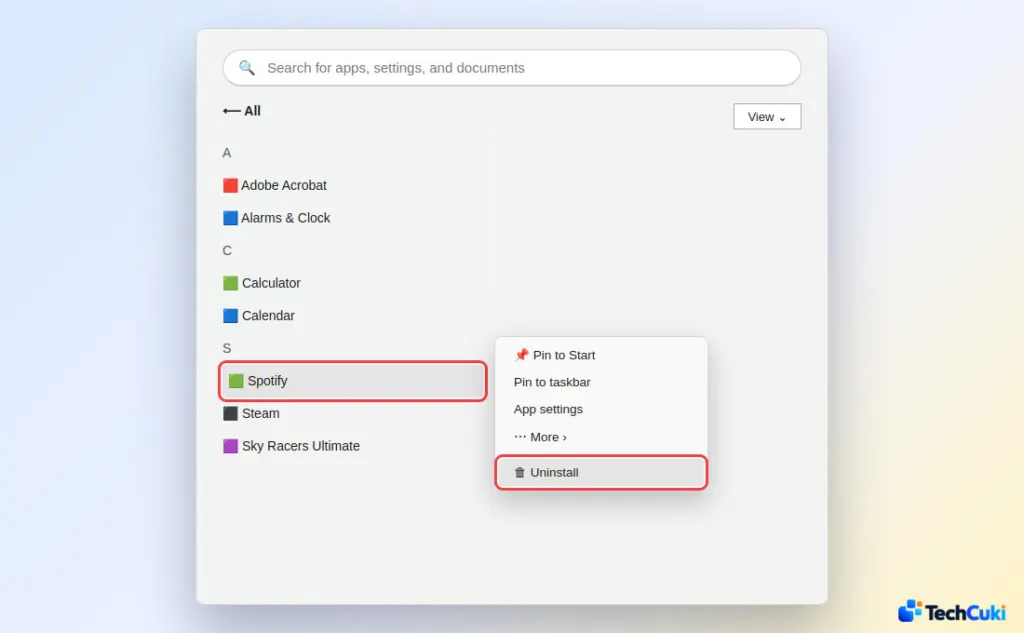
- Select Uninstall.
Store apps disappear immediately. A traditional desktop program sends you to Programs and Features to finish the job.
3. Use Control Panel for Older Programs
Older desktop software registers itself with Programs and Features, so that list is the dependable place to find it.
- Type Control Panel in the taskbar search box and open it.
- Go to Programs, then Programs and Features.
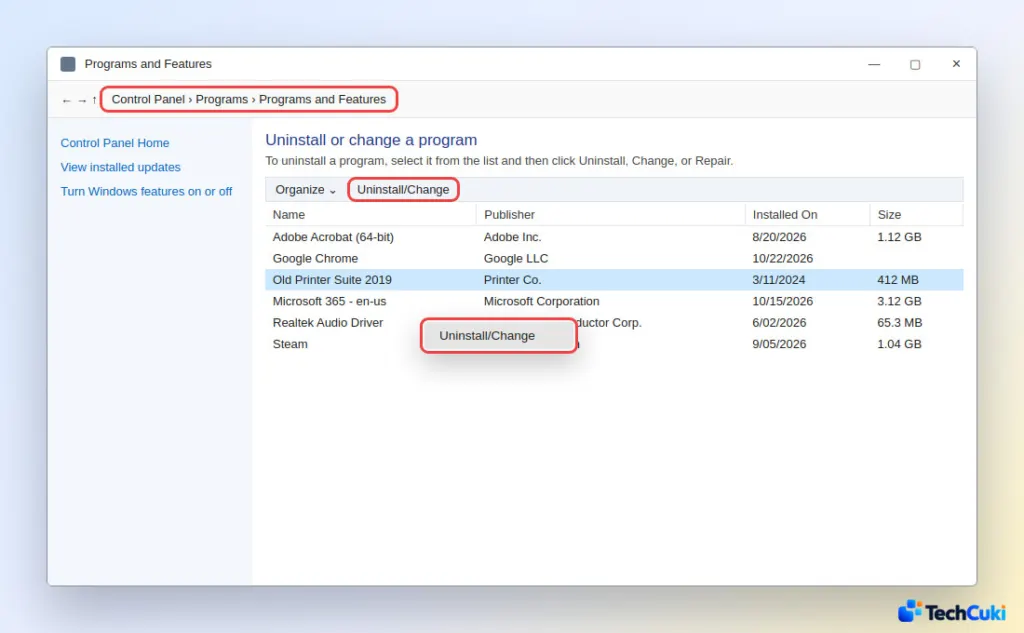
- Right-click the program and select Uninstall or Uninstall/Change.
- Follow the program’s own uninstaller to finish.
4. Uninstall With winget in Terminal
Windows Package Manager (winget) removes an app from one command, which is handy when you’re clearing several programs in a row.
- Right-click Start and select Terminal.
- Run
winget listfollowed by part of the name, such aswinget list spotify, to find the app’s Id.
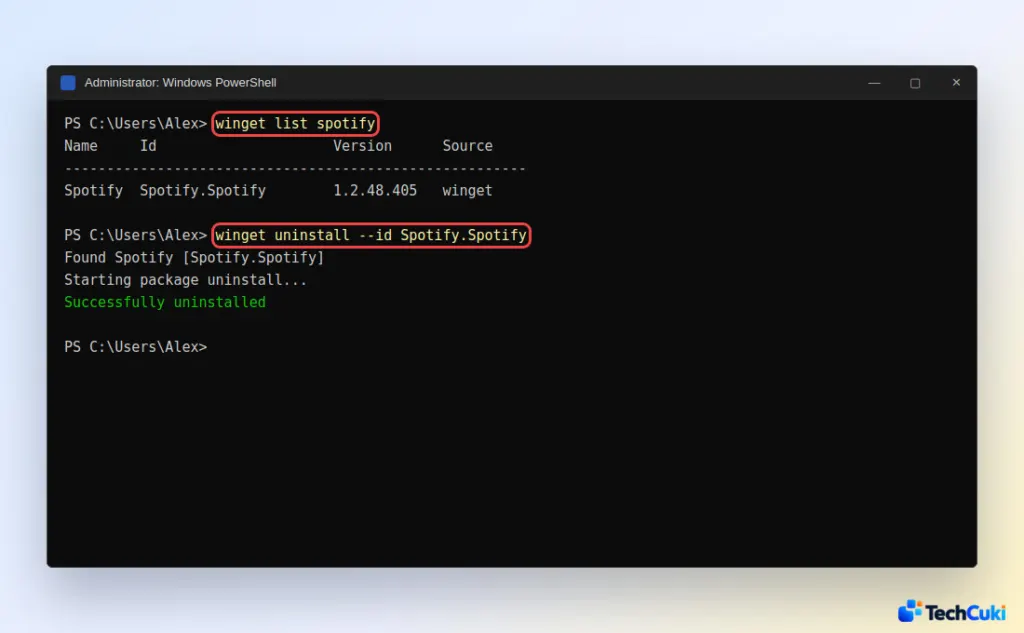
- Run
winget uninstall --idfollowed by that Id, for examplewinget uninstall --id Spotify.Spotify.
Why an App Won’t Uninstall on Windows 11
Some apps are part of Windows and simply can’t be removed, so the Uninstall option is missing or greyed out. For an app that should be removable, work down this list:
| What happens | Try this |
|---|---|
| Uninstall fails because the app is running | Press Ctrl + Shift + Esc, find the app under Processes, select End task, then uninstall again. |
| An error appears during removal | Run Microsoft’s Program Install and Uninstall troubleshooter. Click Advanced, pick the program, or Not Listed if it is missing from the list. |
| The program isn’t in Settings or Control Panel | Open its folder in the Start menu’s All apps list. Many programs ship their own uninstaller there. |
| A background service blocks removal | Boot into Safe Mode and uninstall from there. |
| A preinstalled Store app has no button | In an administrator PowerShell, run Get-AppxPackage | Select Name, PackageFullName, copy the full name, then run Remove-AppxPackage -Package followed by it. |
If a removed app keeps returning after every restart on a work PC, it is likely pushed back by the organization, and only the IT administrator can stop that. If you suspect the app is malware, run a Windows Security scan rather than removing it by hand.
Leftover Files After Uninstalling
Uninstalling removes the program but can leave settings in your user folder (AppData). Restart the PC afterward, and delete a leftover folder only when you’re sure it belonged to the app you removed. Editing registry keys by hand is a last resort that can destabilize Windows, so create a restore point first if you go that far.
Removing apps you no longer use frees space and keeps the PC tidy, and most of them come off cleanly. Be careful with anything Windows itself depends on, and restart afterward so the change takes full effect.


