
Encryption protects a laptop, but sooner or later a hardware change or a firmware update can bring BitLocker to a halt, and that is when people look for how to disable BitLocker. What you should do depends on the reason and on your edition of Windows 11. The sections below cover both editions, the command-line routes, and what to do when the option is missing.
Table of Contents
- Which Option to Use
- Disable BitLocker on Windows 11 Home With Device Encryption
- Disable BitLocker in Control Panel (Windows 11 Pro)
- Disable BitLocker With PowerShell or Command Prompt
- Suspend BitLocker Temporarily for a BIOS Update
- Why Can’t I Turn Off BitLocker?
- Can I Remove BitLocker Without the Recovery Key?
Before you start
- Sign in with an administrator account. Without one, the option to turn off BitLocker isn’t available.
- Save your recovery key before you change anything. For a Microsoft account, get it at account.microsoft.com/devices/recoverykey, or choose Back up your recovery key in Control Panel. A lost key makes an encrypted drive unrecoverable.
- Decrypting can take from about 20 minutes to several hours, so keep a laptop plugged in until it finishes.
Which Option to Use
- A BIOS update, Secure Boot change or hardware swap is coming: method 4, suspend. Your data stays encrypted.
- Home edition: method 1, which uses Device encryption.
- Windows 11 Pro, Enterprise or Education: method 2 in Control Panel, or method 3 in a terminal.
Turning BitLocker off decrypts the drive but deletes nothing. Suspending is the lighter choice whenever the goal is a one-time maintenance task.
1. Disable BitLocker on Windows 11 Home With Device Encryption
Windows 11 Home uses Device encryption instead of full BitLocker, and you can switch it off in Settings. Searching for Device encryption settings opens the same page.
- Open Settings and go to Privacy & security > Device encryption.
- Switch Device encryption to Off.
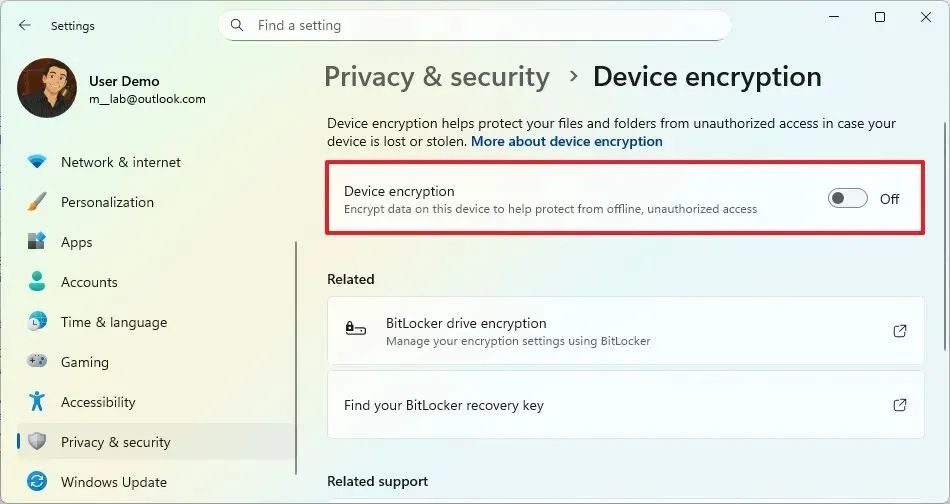
- Select Turn off to confirm.
2. Disable BitLocker in Control Panel (Windows 11 Pro)
On Windows 11 Pro, Enterprise or Education, Control Panel turns BitLocker off and decrypts the drive. It stays off until you turn it on again.
- Open Control Panel and go to System and Security > BitLocker Drive Encryption. Searching for Manage BitLocker gets there faster.
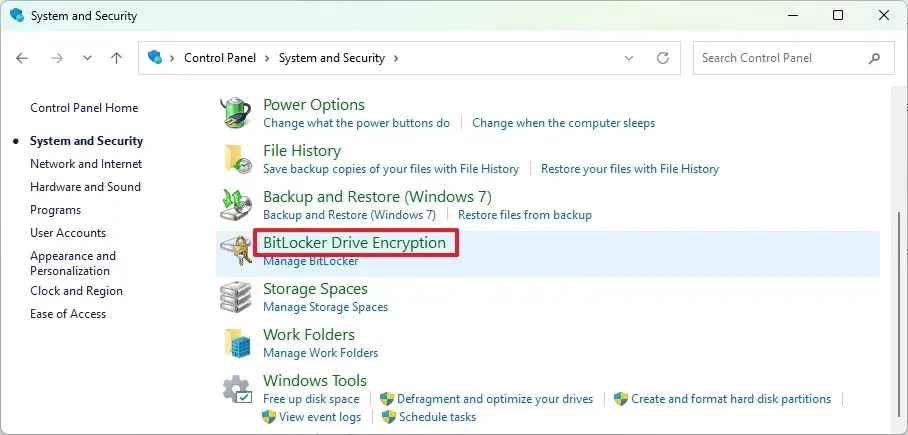
- Next to the drive, click Turn off BitLocker. If a data drive is locked, click Unlock drive and enter its password first.
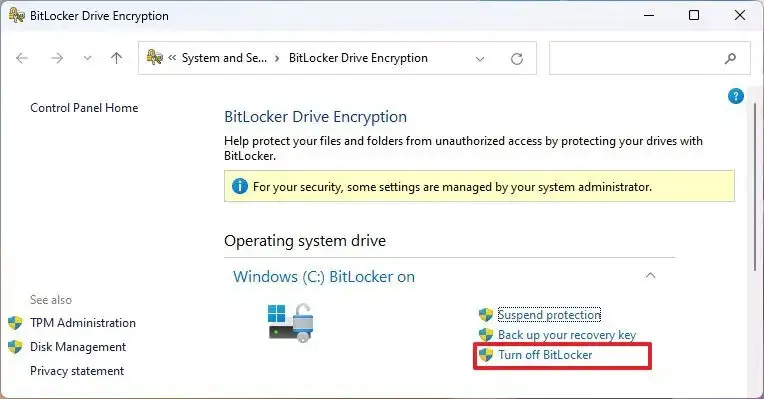
- Select Turn off BitLocker to confirm.
Windows decrypts in the background, and the page shows the drive as unprotected once it finishes. You can keep using the PC meanwhile. A sleep or shutdown pauses the job, and it picks up where it left off.
3. Disable BitLocker With PowerShell or Command Prompt
An administrator PowerShell window can turn off BitLocker on the C: drive with a single command. The cmdlet removes all key protectors and starts decrypting immediately.
- Open PowerShell as an administrator.
- Run
Disable-BitLocker -MountPoint "C:".
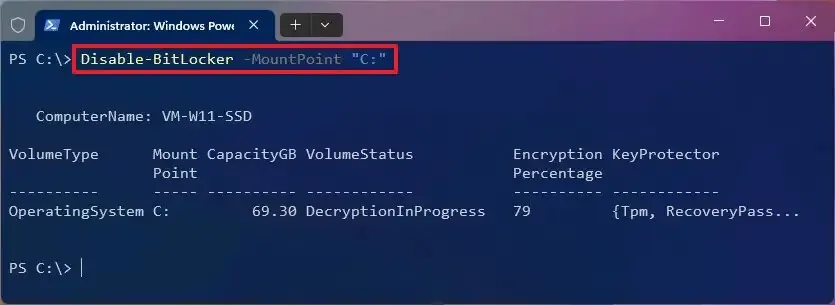
- Check progress with
manage-bde -status. The VolumeStatus shows DecryptionInProgress while the drive decrypts.
In Command Prompt opened as an administrator, manage-bde -off C: does the same job.
If the cmdlet refuses to run on the system drive, the volume has automatic unlock keys. Run Clear-BitLockerAutoUnlock first and try again. To decrypt every volume at once, run $BLV = Get-BitLockerVolume followed by Disable-BitLocker -MountPoint $BLV.
4. Suspend BitLocker Temporarily for a BIOS Update
Suspending keeps the drive encrypted but lets the PC start without checking the TPM, so a firmware change doesn’t trigger the BitLocker recovery screen at the next startup. Skipping it is the usual way people end up typing a recovery key after a BIOS update.
- Open BitLocker Drive Encryption in Control Panel again.
- Click Suspend protection, then select Yes.
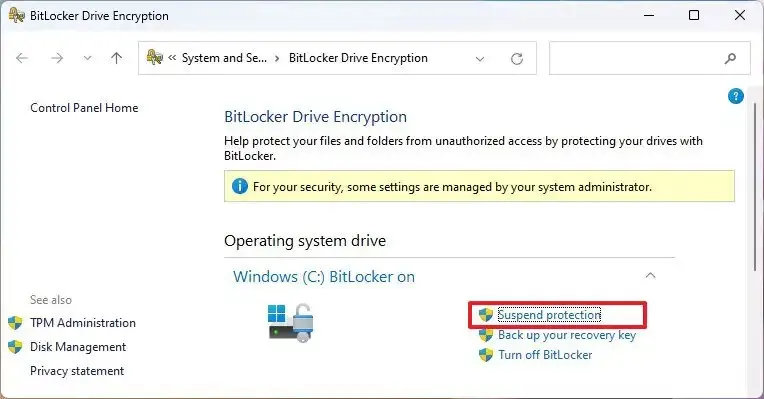
- After the update, click Resume protection.
BitLocker stays suspended across restarts until you resume it, so don’t forget the last step. Changing Secure Boot settings or booting from a live USB can trigger recovery too, which is why Secure Boot changes belong inside a suspend window. If that’s your plan, read our guide to enabling Secure Boot on Windows 11 first.
Why Can’t I Turn Off BitLocker?
The option is usually missing for one of three reasons.
- The PC runs the Home edition, where Device encryption stands in for full BitLocker.
- Your account isn’t an administrator.
- Your organization manages the PC through a work or school policy, and only the IT admin can change it.
Can I Remove BitLocker Without the Recovery Key?
Yes, if Windows starts normally and you can sign in as an administrator. In that case, you can turn BitLocker off without typing the recovery key.
If the PC is stuck at the BitLocker recovery screen, you need the recovery key, and there is no supported way around that screen. Without the key, the data stays locked and the only way back is reinstalling Windows.
Turning encryption off is easy to undo, but an unprotected drive is readable by anyone who gets hold of it, so it is worth switching protection back on once the job is done. For firmware work, our guide to getting into BIOS on Windows 11 is a useful companion.


