
Seeing a blue page that asks for a long key before Windows will start is alarming, especially when you were only trying to use your laptop. The BitLocker recovery screen appears when Windows 11 notices a change it can’t verify, and your files are safe while it waits for the key. The sections cover getting back in, working out what triggered it and keeping it from returning.
Table of Contents
Get Past the BitLocker Recovery Screen
You need the 48-digit recovery key. The screen itself often hints at where it was saved, and from Windows 11 24H2 it also shows which Microsoft account holds it, so read the lines under the prompt first. Then, on a second device, open aka.ms/myrecoverykey and sign in with that account. Work and school PCs keep the key in the organization’s account instead (aka.ms/aadrecoverykey, then Devices > View BitLocker Keys), or with the IT department. Our guide on where to find your BitLocker recovery key lists the other places it hides, such as a printout or USB drive.
- On the BitLocker recovery screen, note the Recovery key ID, then match it to the Key ID next to the key you found. If the drive has more than one key, only the matching one works.
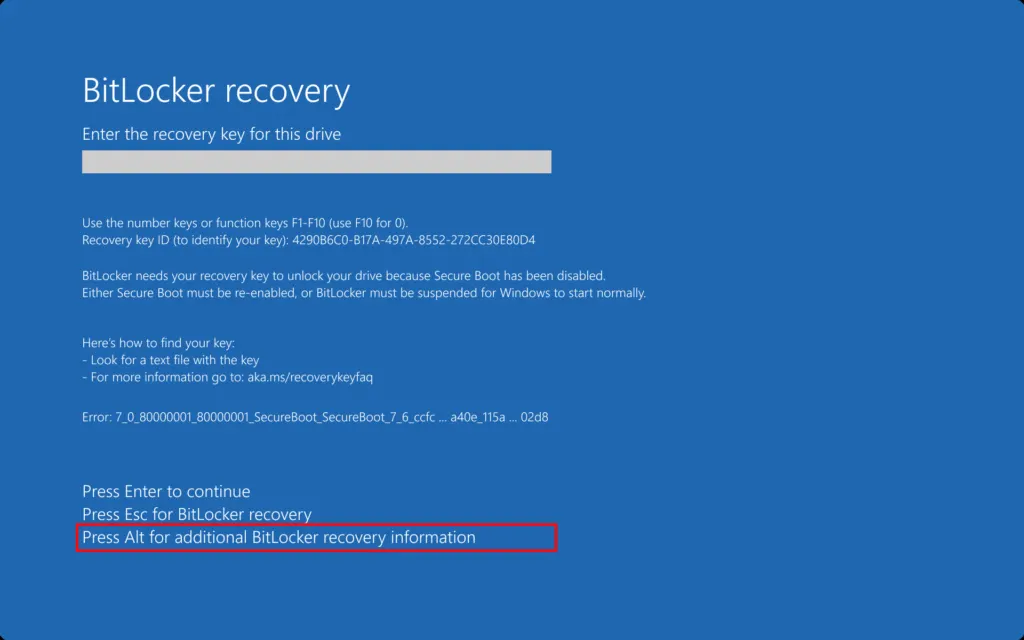
- Type the 48 digits with the number keys, or with
F1throughF10, whereF10stands for 0. - Press
Enter.Escopens more recovery options.
When the key is accepted, Windows starts normally. Don’t restart yet if you plan to fix the trigger, because the same screen will come back until the cause is dealt with.
Find Out What Triggered the Recovery Screen
Press Alt on the recovery screen to read the error category and code, a feature of Windows 11 24H2 and later.
- Press
Alton the BitLocker recovery screen to open the additional recovery information.
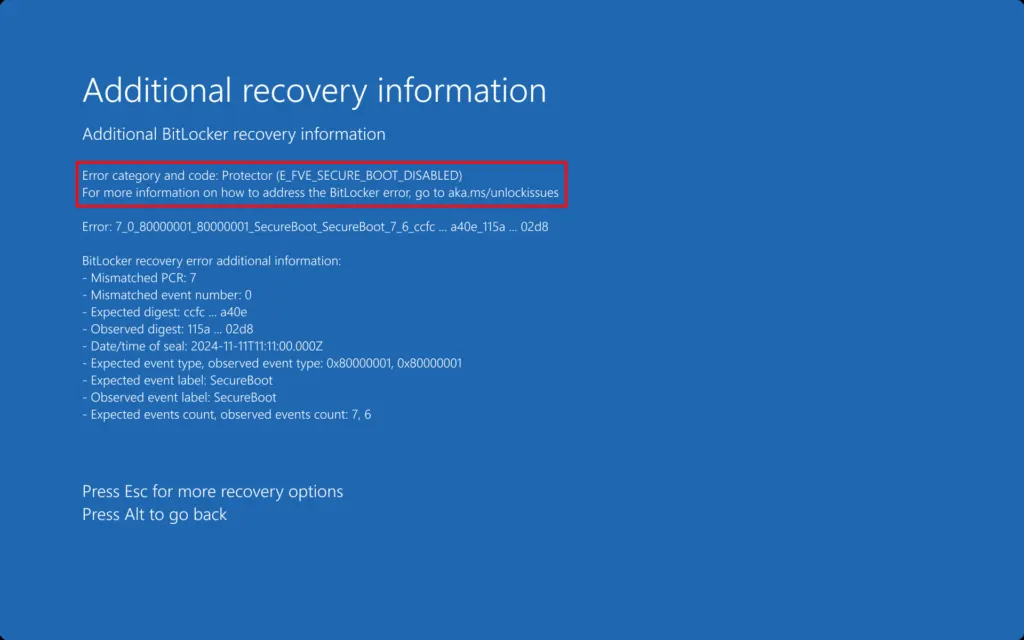
- Find the code and match it in the table.
| Code | What happened | What to do |
|---|---|---|
| E_FVE_PCR_MISMATCH | The startup configuration changed: bootable media in a drive, or a firmware update applied without updating the TPM protector | Remove USB drives and discs, then restart. After a firmware update, re-seal the drive (see the suspend and resume section) |
| E_FVE_SECUREBOOT_DISABLED | Secure Boot was turned off | Turn it back on in UEFI, then restart |
| E_FVE_SECUREBOOT_CHANGED | The Secure Boot configuration changed | Recovery key needed, then re-seal the drive |
| E_FVE_TPM_DISABLED or E_FVE_TPM_NOT_DETECTED | The TPM is turned off or can’t be found | Re-enable it in UEFI |
| E_FVE_BAD_CODE_ID | A boot application changed | Restore the boot configuration, or use the key |
| E_FVE_DEVICE_LOCKEDOUT | Too many wrong sign-in attempts, mostly on work devices with that policy | Use the key to return to sign-in |
| E_FVE_USER_REQUESTED_RECOVERY | Someone pressed Esc to enter recovery |
Restart and let it boot normally |
A code isn’t the whole story on every PC. On one reported case, Windows Update had switched off the Intel PTT firmware TPM in the BIOS, and turning it back on ended the loop. If the code points at the TPM and your TPM setting reads disabled, that is the first place to look. Other everyday triggers are a BIOS or UEFI update, an AMD fTPM reset after a CPU swap, a new motherboard, and a docking station or USB drive left plugged in at startup.
Undo the Change That Caused It
Reverse whatever the code points to, restart, and check whether the prompt is gone.
- Unplug USB drives, the docking station and any bootable media, then restart.
- If Secure Boot is off, switch it back on in the UEFI settings. Our guide on how to get into BIOS on Windows 11 shows how to reach them.
- If the TPM is off, turn it on again. Our guide on how to enable TPM on Windows 11 covers it.
Success looks like a normal boot straight to sign-in. For Secure Boot errors this alone can work, because BitLocker only wants the measurements it saw before. If the prompt returns anyway, re-seal the drive.
Suspend and Resume BitLocker to Re-Seal the Drive
Suspending and resuming protection makes BitLocker record the PC’s current startup state, so the same change stops triggering recovery.
- Open Control Panel, go to System and Security, then select BitLocker Drive Encryption.
- Click Suspend protection.
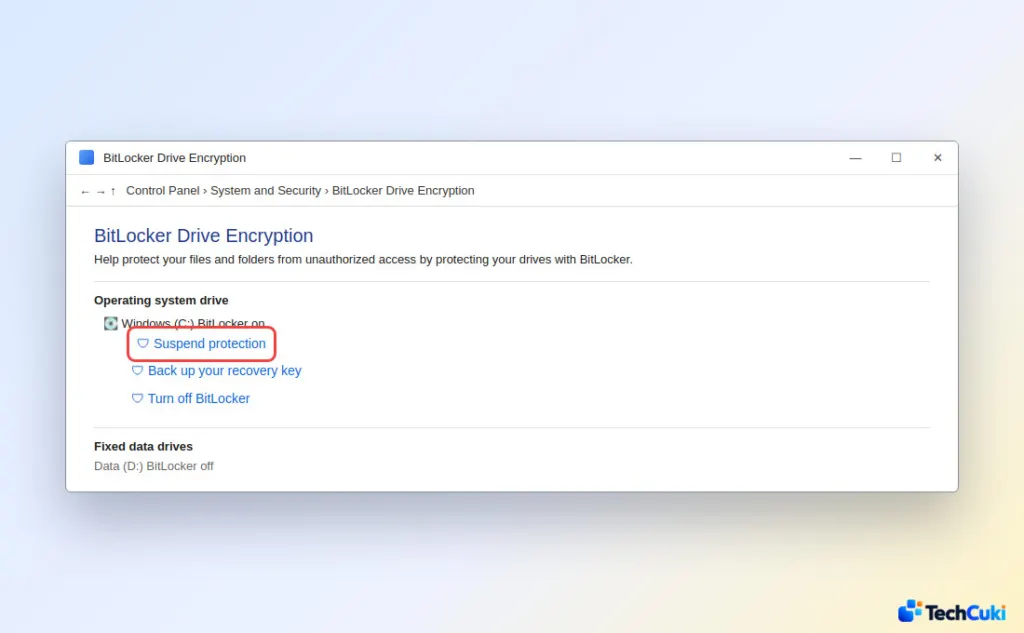
- Click Yes to confirm, then restart the PC.
- Back on the same page, click Resume protection.
Windows 11 Home uses Device encryption, so the Control Panel page may be missing. Use Command Prompt instead.
Using Command Prompt
- Open Command Prompt as administrator.
- Run
manage-bde -protectors -disable C:.
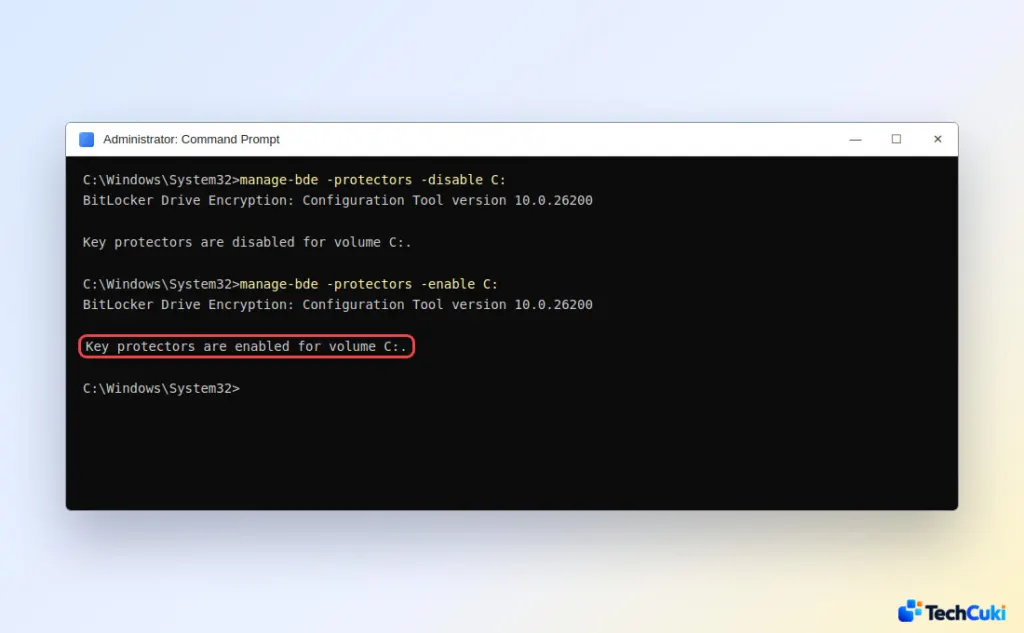
- Restart the PC, then run
manage-bde -protectors -enable C:.
Fix the BitLocker Recovery Screen on Every Boot
If it asks for the key at every startup, the TPM protector is out of step with the hardware, and rebuilding it is the fix. This deletes the existing TPM protector, so keep your recovery key on hand before you start.
- Open Command Prompt as administrator and run
manage-bde -protectors -delete C: -type TPM. - Run
manage-bde -protectors -add C: -tpm. - Restart the PC.
If the prompt still returns, check the BIOS for a disabled or reset TPM and for a Secure Boot state that keeps flipping.
Prevent It Before a BIOS Update
Suspend BitLocker before installing BIOS or firmware updates, since a firmware change is a classic cause of E_FVE_PCR_MISMATCH.
- Suspend protection with the steps above.
- Install the update and let the PC restart.
- In Windows, open the BitLocker page and click Resume protection if it still shows as suspended.
What If You Don’t Have the Recovery Key?
There is no safe way to skip the screen. Makers such as ASUS state they can’t retrieve the key, because it is stored only in your account or on your device. Check every Microsoft account used on the PC: modern devices with automatic device encryption usually save the key to a Microsoft account, and if someone else set the PC up, it may sit in that person’s account. On a work PC, ask IT. If the key truly can’t be found, the remaining option is reinstalling Windows, which erases everything on the drive.
Keeping your drive protected is worth the occasional interruption, and a little preparation makes the screen far less likely to return. If the prompt keeps appearing for no clear reason, Microsoft support or your PC maker can help check the device.


