
An error screen mentioning Secure Boot at startup can make a PC look unusable before Windows even loads. A Secure Boot violation usually comes down to a recent change, a connected device or a firmware setting. The sections below cover 6 fixes for Windows 11 PCs, from simple checks to deeper repairs, and when to stop and contact the maker.
Table of Contents
- What Triggers This Error on Windows 11
- Remove USB Drives and Restart
- Reset Secure Boot Keys to Factory Defaults
- Turn Secure Boot Off Briefly
- Run Startup Repair
- Check Boot Mode and Rebuild the EFI Files
- Use Secure Boot Recovery on ASUS Laptops
- Update the BIOS to Clear a Secure Boot Violation
- “Invalid Signature Detected” Only on a USB Drive
- Will Windows 11 Run Without Secure Boot?
- If the Secure Boot Violation Keeps Coming Back
What Triggers This Error on Windows 11
The firmware checks every boot component against its stored keys, so anything that changes either side of that check can trip it:
- A Windows reinstall, or an OS other than the preinstalled one, leaves loader keys that no longer match.
- A bootable USB drive (Rufus, Ventoy or a Linux installer) is still plugged in.
- The Secure Boot keys in the BIOS are corrupted, or a firmware update reset them.
- The firmware is in Legacy or CSM mode, or the system disk uses MBR instead of GPT. Secure Boot only works in UEFI mode.
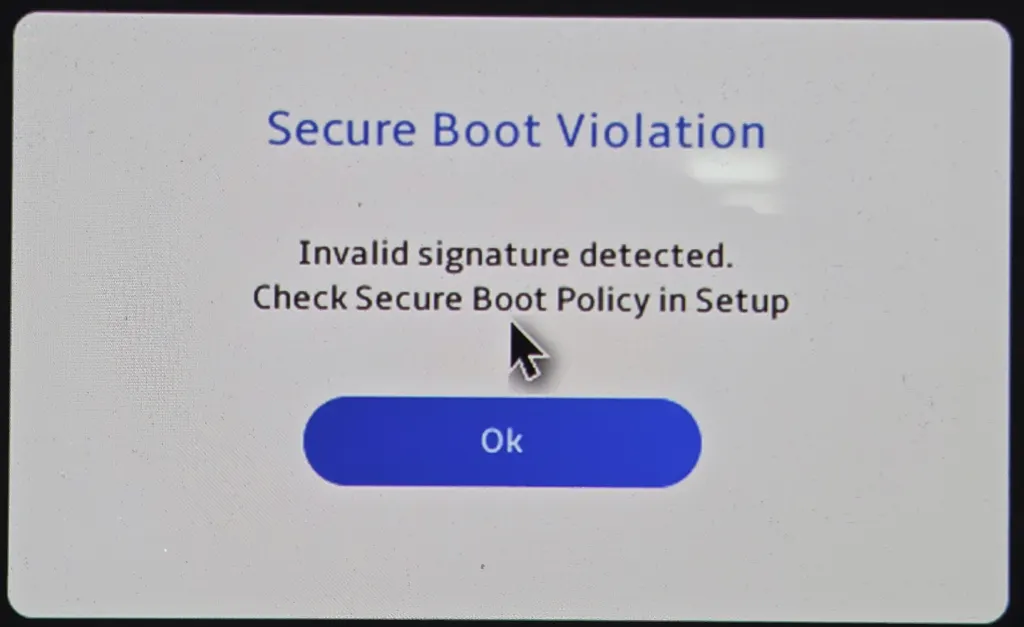
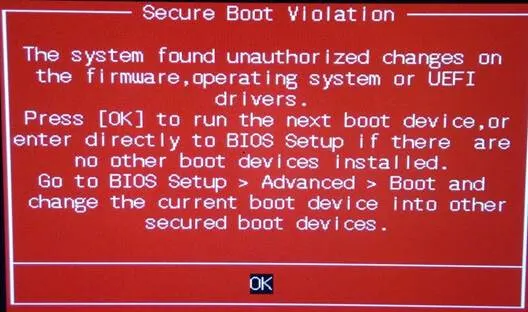
Some PCs show a red box instead, reading “The system found unauthorized changes on the firmware, operating system or UEFI drivers,” with an OK button.
| Situation | Try |
|---|---|
| A USB or external drive is connected | Fix 1 |
| Started after a BIOS update or reinstall | Fix 2 |
| Keys restored but Windows still won’t start | Fix 4, then the boot-mode checks |
| Only happens from a USB installer | USB section near the end |
1. Remove USB Drives and Restart
A bootable drive left plugged in is the cheapest cause to rule out.
- Shut the PC down completely.
- Unplug every USB drive, SD card and external hard drive, including any installer.
- Power the PC back on.
If you got the red box with an OK button, press OK and the PC tries the next boot device.
2. Reset Secure Boot Keys to Factory Defaults
This fixes the largest share of cases because it swaps corrupted or mismatched keys for the maker’s defaults.
- Restart the PC and press your maker’s BIOS key (F2, Del, F10 or Esc). Our guide on how to get to BIOS on Windows 11 lists the keys by brand. On ASUS laptops, hold F2, then press the power button.
- Go to Security (on some boards it is Boot or Authentication), then select Secure Boot.
- Open Key Management.
- Choose Restore Factory Keys or Install default Secure Boot keys, then confirm with Yes.
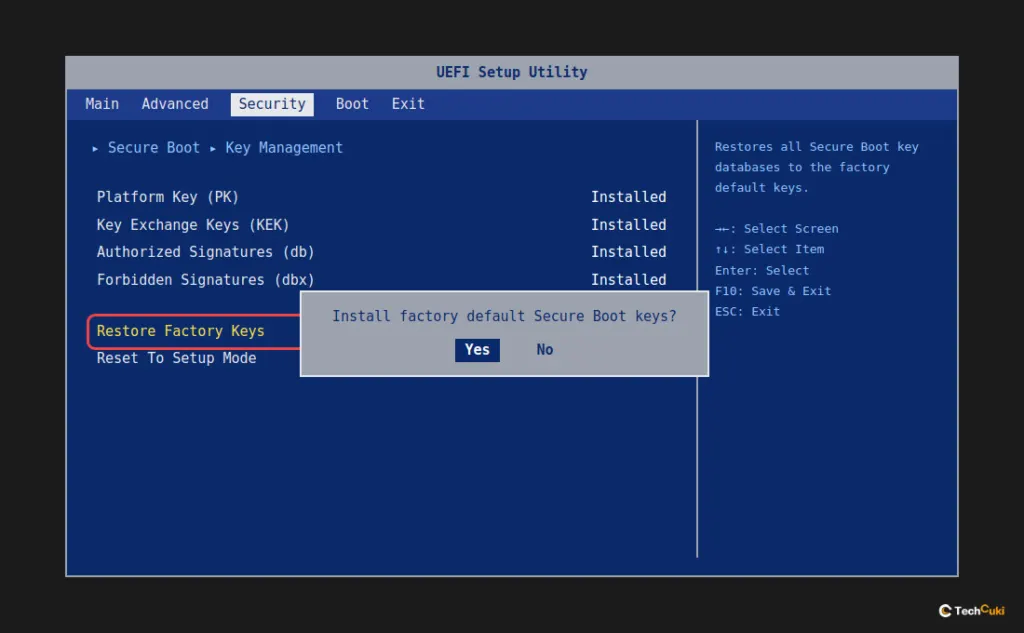
- Press
F10to save and exit, with Secure Boot set to On.
Choose Restore or Reset, never Clear or Delete all keys. With no keys stored, nothing is trusted and nothing will boot. On ASUS boards each key (PK, KEK and db) has its own Update or Reset to factory option. On some MSI boards the option appears only after you set Secure Boot Mode to Custom, where it reads Install all factory default keys.
3. Turn Secure Boot Off Briefly
If Windows starts with Secure Boot off, the trouble is one boot file’s signature, not the PC itself.
- Enter the BIOS the same way as in Fix 2.
- Set Secure Boot to Disabled.
- Press
F10to save and exit.
Once Windows loads, install pending updates and turn Secure Boot back on. Leaving it off blocks Windows 11 anti-cheat games: an MSI laptop owner on the MSI forum could boot with it disabled, yet Valorant’s Vanguard would not launch.
4. Run Startup Repair
Startup Repair rebuilds damaged boot configuration data, which can keep tripping the signature check even after the keys are restored.
Windows opens Automatic Repair after two or three failed starts. To force it, hold the power button during startup three times.
- Wait for the Automatic Repair screen, or force it.
- Select Troubleshoot, then Advanced options.
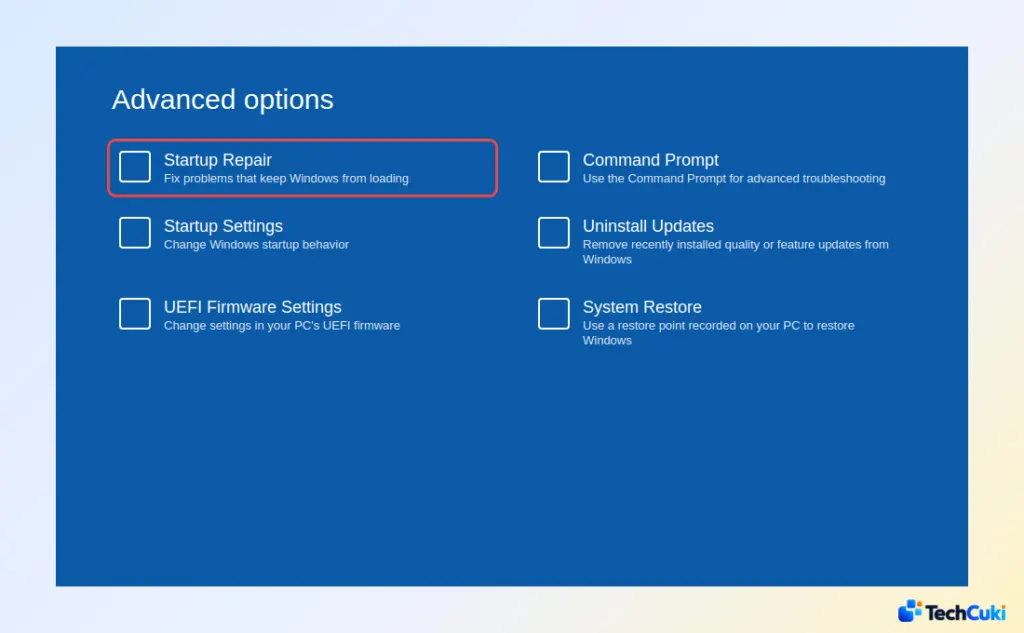
- Select Startup Repair and let it run, which can take several minutes.
BitLocker may ask for your recovery key here. Our guide to finding your BitLocker recovery key shows where to get it. If Startup Repair reports it couldn’t fix anything, go to the next fix.
5. Check Boot Mode and Rebuild the EFI Files
If the violation returns every time you switch Secure Boot on, the firmware is probably not in plain UEFI mode, because CSM and Secure Boot can’t run together.
- In the BIOS, set Boot Mode to UEFI and turn off CSM or Legacy Support. HP’s support staff give the same advice: Legacy Support off, Secure Boot on, after updating the BIOS.
- If it still fails, boot from Windows installation media, choose Repair your computer > Troubleshoot > Advanced options > Command Prompt, and run
mountvol X: /sto mount the EFI partition. - Run
bcdboot C:\Windows /s X: /f UEFI. It copies fresh, signed boot files from Windows into the EFI partition. Check the Windows drive letter withdir C:\Windowsfirst, because recovery environments sometimes assign a different one. - Type
exit, remove the USB, restart, and turn Secure Boot back on with factory keys.
A disk that still uses MBR can’t boot under Secure Boot. In the same Command Prompt, run diskpart then list disk: no asterisk under the GPT column means MBR. mbr2gpt /convert /disk:0 /allowFullOS converts it without erasing data (change the disk number if needed), but back up first and switch the firmware to UEFI afterward.
6. Use Secure Boot Recovery on ASUS Laptops
Some ASUS laptops carry a Microsoft recovery loader you can run from a USB stick. If the file in step 2 doesn’t exist on your PC, skip this fix.
- Turn Secure Boot off as in Fix 3 and boot into Windows.
- In File Explorer, check whether
C:\Windows\Boot\EFI\SecureBootRecovery.efiexists. - On an empty FAT32 USB drive (formatting erases it), create the folders
EFIand, inside it,BOOT. Copy the file intoEFI\BOOTand rename itbootx64.efi. The folder matters: one MSI forum user’s identical fix failed until the file was moved out of the drive’s root and intoEFI\BOOT. - Restart, hold
Escand press the power button to open the boot menu, then choose the USB drive. - Wait for the “Microsoft Secure Boot Recovery” tool to finish. The PC restarts by itself.
- Turn Secure Boot back on in the BIOS.
7. Update the BIOS to Clear a Secure Boot Violation
A newer BIOS can repair how the firmware handles keys, and re-flashing the same version also resets the Secure Boot state on some boards, per MSI forum replies.
- Check your current version with our guide to checking the BIOS version on Windows 11.
- Find the update for your exact model on the PC or motherboard maker’s support site.
- Download it and install it following the maker’s instructions. Photograph your BIOS settings first, because an update can silently reset them.
“Invalid Signature Detected” Only on a USB Drive
If the message appears only when you boot from a USB installer, the firmware is rejecting that drive’s boot files, not your Windows installation.
- Recreate a Windows 11 USB with Microsoft’s Media Creation Tool, which makes media that boots with Secure Boot on.
- For Linux, pick a distribution that supports Secure Boot, such as Ubuntu or Fedora. Ventoy asks you to enroll its key on the first Secure Boot start, so follow that prompt rather than skipping it.
- For a one-time install, disable Secure Boot using Fix 3, finish, then turn it back on.
Will Windows 11 Run Without Secure Boot?
Yes, it runs, but you lose protection against rootkits that load before Windows, and some anti-cheat software refuses to start. Treat “off” as a temporary state while you repair the cause.
If the Secure Boot Violation Keeps Coming Back
Most startup errors like this can be sorted out without losing files, though it pays to back up anything important before a deeper repair. Take changes one at a time so you know what made the difference. If the PC still will not start, the manufacturer’s support is the next step.


