
Trying to turn Secure Boot on and being told it can’t be enabled yet is a frustrating place to get stuck in the BIOS. The message about Secure Boot can be enabled when System in User Mode usually comes down to how the board is currently set up rather than anything being broken. The steps cover MSI and other boards, plus what to try if the message returns.
Table of Contents
Before you start
- If BitLocker or device encryption is on, changing Secure Boot keys can trigger BitLocker recovery on the next boot. Suspend protection first (Control Panel > BitLocker Drive Encryption > Suspend protection) or have your BitLocker recovery key ready.
- Don’t disable CSM while your Windows disk still uses MBR. Windows won’t boot until the disk is converted to GPT, so back up your data before you touch the partition.
Why the BIOS Says Setup Mode
Secure Boot only switches on when System Mode reads User, and it reads Setup until the factory Secure Boot keys (PK, KEK, db and dbx) are enrolled.
Windows can’t change this state, so every fix happens in the BIOS. Which section you need depends on what you see:
| What you see | Go to |
|---|---|
| msinfo32 shows BIOS Mode: Legacy | Section 1, then Section 2 |
| BIOS Mode is UEFI, but the Secure Boot page says System Mode: Setup | Section 3 |
| You set UEFI and the PC drops back into the BIOS instead of Windows | The disk is still MBR, so do the conversion in Section 1 |
| Key options are greyed out | Set Secure Boot Mode to Custom first (Section 3) |
1. Check Boot Mode and Partition Style
Secure Boot needs UEFI boot on a GPT disk, so check both before you touch the BIOS.
- Press Win + R, type
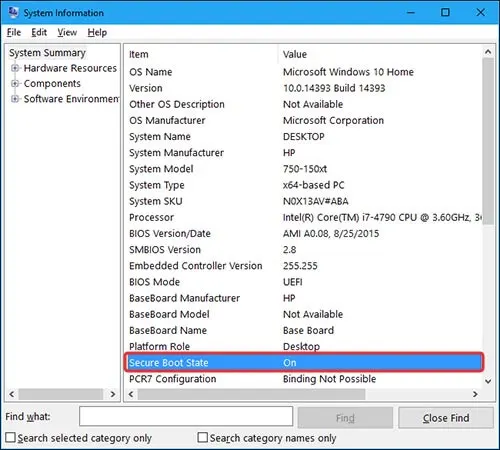
msinfo32, and press Enter. Secure Boot State should read Off or Unsupported right now, and BIOS Mode must read UEFI, not Legacy.
- Press Win + R, type
diskmgmt.msc, right-click Disk 0, and choose Properties. On the Volumes tab, read the Partition style value.
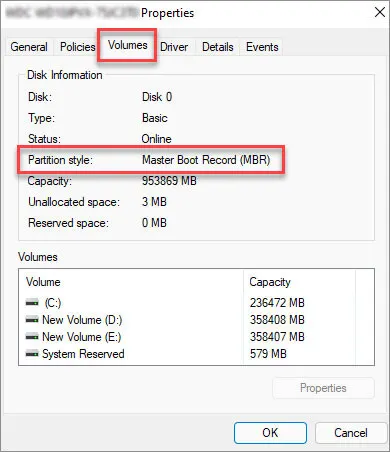
- If it reads MBR, back up your data. Then open Command Prompt as administrator and run
mbr2gpt /validate /allowFullOS, followed bymbr2gpt /convert /allowFullOS. Validation fails if the disk has more than three partitions, if BitLocker or other encryption is on, or if Secure Boot is already on. The tool also needs 64-bit Windows 10 version 1703 or later. - Don’t restart into Windows after the conversion. Go straight into the BIOS and switch to UEFI, because the converted disk no longer boots in Legacy mode.
2. Open the BIOS and Switch to UEFI Mode
Turn CSM off, or set the boot mode to UEFI, so the firmware boots the GPT disk natively.
- Restart the PC and press Del or F2 at the startup screen. If you can’t catch the key, follow our guide to getting into the BIOS on Windows 11, which covers the Advanced startup route to UEFI Firmware Settings.
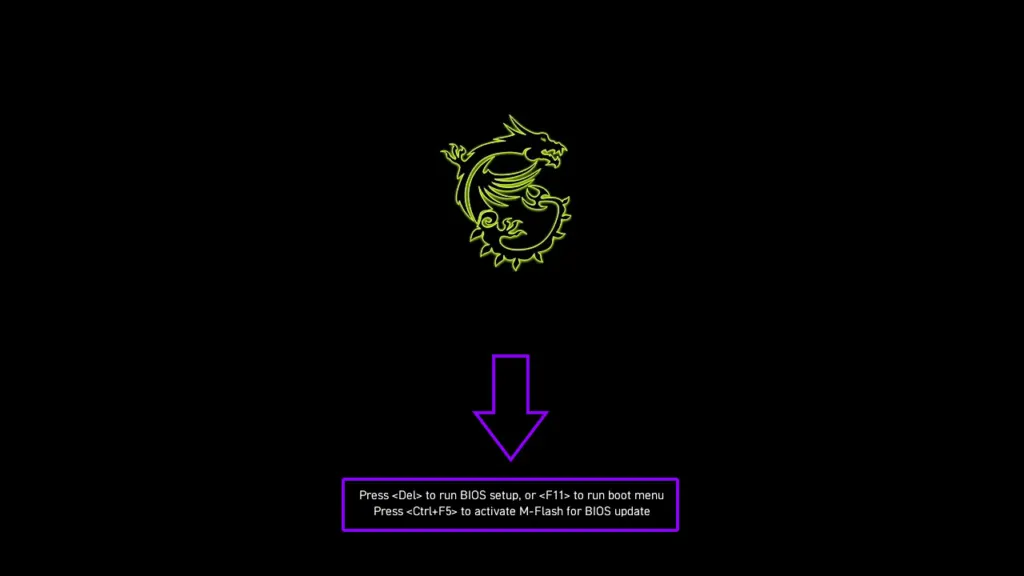
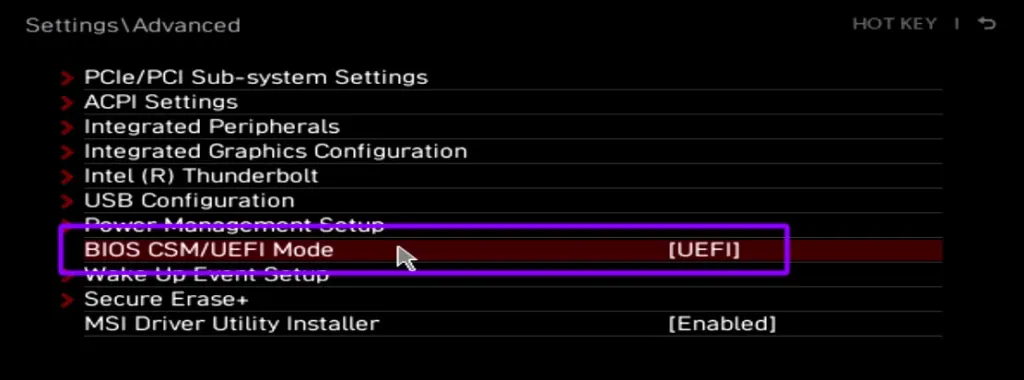
- Find the CSM or boot mode setting and change it to UEFI or disabled CSM, then save and reboot back into the BIOS.
- ASUS: Boot > CSM > Disabled
- MSI: Settings > Advanced > BIOS CSM/UEFI Mode > UEFI
- Gigabyte: Boot > CSM Support > Disabled
If the PC lands back in the BIOS every time instead of loading Windows, Windows was installed in CSM mode on an MBR disk. Switch CSM back on, boot into Windows, and finish the conversion in Section 1.
3. Install the Default Keys to Fix “Secure Boot Can Be Enabled When System in User Mode”
Enrolling the factory keys is the step that moves System Mode from Setup to User, and the menu names change from brand to brand.
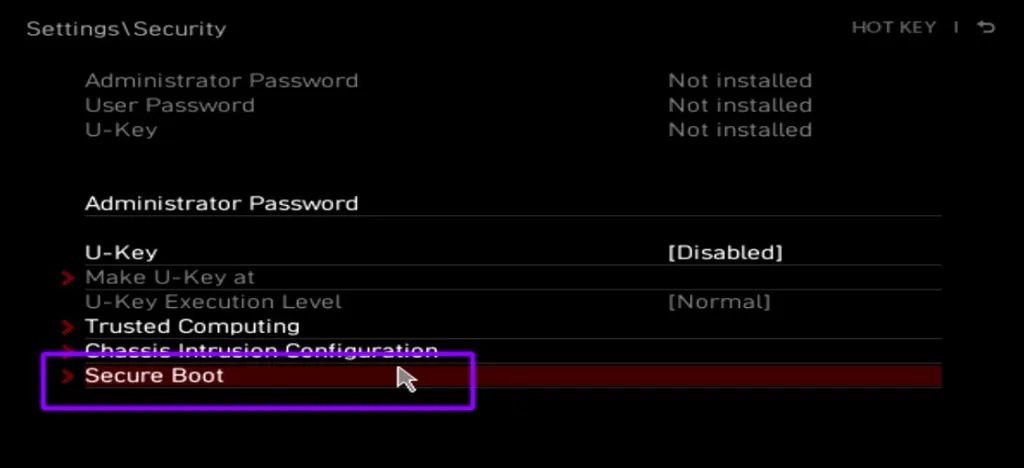
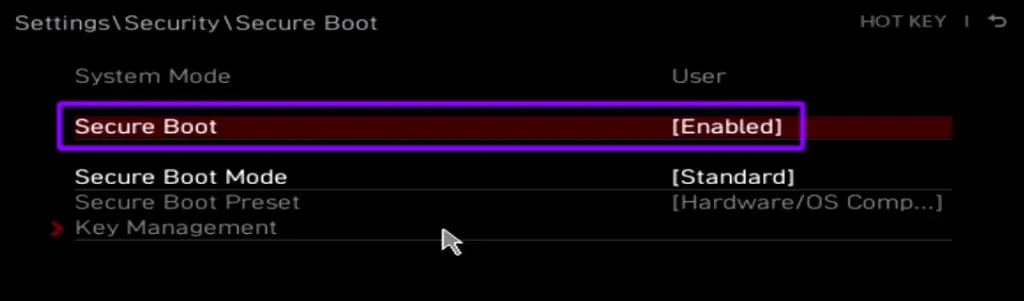
- Open the Secure Boot page. On MSI, go to Settings > Security > Secure Boot and set Secure Boot Mode to Custom. Key management stays greyed out in Standard mode, which is why many people can’t find it.
- Open Key Management and choose Enroll all Factory Default keys, then select Yes. If the BIOS asks about Reset Without Saving, select Yes and re-enter the BIOS.
Other brands use different labels for the same step:
- ASUS: Boot > Secure Boot > OS Type “Windows UEFI mode” > Key Management > Install Default Secure Boot keys
- Gigabyte/AORUS: Boot > Secure Boot > Secure Boot Mode: Custom > Restore Factory Keys > Yes (some versions say Install default Secure Boot keys), then set the mode back to Standard
- ASRock: Security > Secure Boot > Secure Boot Mode: Custom > Install Default Secure Boot Keys > Yes
- Other boards: look for Key Management, Restore Factory Keys, or Install Default Keys. Many BIOS screens have a search function on F9, and the motherboard manual lists the exact path.
When the keys are in, System Mode reads User. On some MSI boards, simply switching Secure Boot Mode from Custom back to Standard is enough to flip it to User, so try that if no enroll option appears.
4. Turn Secure Boot On and Check It in Windows
With System Mode on User, the Secure Boot switch finally accepts Enabled.
- On the same page, set Secure Boot to Enabled with Secure Boot Mode on Standard, then press F10 to save and exit.
- Back in Windows, press Win + R, type
msinfo32, and confirm that Secure Boot State reads On and BIOS Mode reads UEFI.
To undo it, return to the same page and set Secure Boot to Disabled. The enrolled keys can stay.
If the Message Keeps Coming Back
When System Mode still reads Setup after the keys are installed, the BIOS firmware is the next suspect.
- Update the BIOS from your motherboard maker’s site. On some older MSI boards the newest BIOS ships with the keys already enrolled, and a reader on an MSI forum reached Secure Boot only after flashing it. Don’t power off during the flash, and check your current BIOS version first so you know whether a newer one exists.
- Load optimized defaults (F5 or F9), then repeat the key step. This is worth trying on a prebuilt PC.
- If the screen goes black after changing key settings, flashing the BIOS is the recovery route.
If Secure Boot turns on and Windows then reports a violation, see our Secure Boot violation guide.
Once Secure Boot shows On, the BIOS part is done and the rest happens in Windows. You can read more in our guide to enabling Secure Boot on Windows 11, and if the PC also needs TPM 2.0 for Windows 11, our TPM guide covers that. BIOS options differ between makers, so the board maker is the place to turn if yours looks different.


